Argo™ CD (preview)
For Elastisys Managed Services Customers
You can order Managed Argo™ CD by filing a service ticket. Here are the highlights:
- Disaster recovery:
- Backup scope includes Argo CD resources that can be created by application developers, such as:
- ApplicationSets
- Applications
- AppProjects
- Secrets and ConfigMaps as needed to store configuration on repositories and notifications.
- A backup is taken every day between 0:00 am and 6:00 am CET. The backup retention period is 30 days unless otherwise requested by the customer.
- Recovery time objective (RTO): 4 hours.
- Backup scope includes Argo CD resources that can be created by application developers, such as:
- Monitoring, security patching and incident management: included.
For more information, please read ToS Appendix 3 Managed Additional Service Specification.
This is a preview feature. For more information, please read ToS 9.1 Preview Features.
Important
You cannot ask Argo CD to create a Namespace. This also means that you cannot template the Namespace in ApplicationSets.
Why? See ADR-0042

This help you build a mental model of how to levarage Argo CD for deploying your application.
This page will help you succeed in connecting to Argo CD application which meets your security and compliance requirements.
Getting Access
Your administrator will set up the authentication inside Compliant Kubernetes, which will give you access to ArgoCD UI.
Follow the Go-Live Checklist
You should be all set. Before going into production, don't forget to go through the go-live checklist.
CK8S Argo CD Release Notes
Check out the release notes for the Argo CD setup that runs in Compliant Kubernetes environments!
Secret Management
Secret values should never be stored in plain-text in code repositories. The following sections will describe two supported approaches on how Application Developers can do secret management with Elastisys Managed Argo CD.
With Helm Secrets
Argo CD can be configured to decrypt files encrypted with sops using Helm Secrets. To be able to use Helm-secrets with Argo CD, you will need to contact your Platform Administrator requesting that you want to use this feature and for which OIDC group, users or ServiceAccounts (otherwise the Application Developer group used for accessing the cluster is assumed). Once your Platform Administrator has approved your request, you should be able to create and manage a Kubernetes Secret resource in the argocd-system namespace as instructed below.
The following steps will show how to get started with encrypting files using sops and gpg, storing the encrypted files in a Helm chart, and lastly deploying the Helm chart with Argo CD.
-
Generate a new GPG key-pair (make sure not to add a passphrase as otherwise Argo CD will not be able to use the key) and then export the private key. The following example will create a GPG key and export the private key to a file named
private.asc:gpg --batch --rfc4880 --passphrase '' --quick-generate-key "set-me@example.com" default default fpr=$(gpg --with-colons --list-keys "set-me@example.com" | awk -F: '$1 == "fpr" {print $10; exit}') gpg --output "private.asc" --armor --export-secret-key $fpr -
For Argo CD to be able to use this key for decrypting
sopsencrypted values files in your Helm charts, you will need to create a Kubernetes Secret in theargocd-systemnamespace namedhelm-secrets-private-keys. This secret will then be mounted and read by the Argo CD repo server. Create the Secret using the private key file created in the previous step:PRIVATE_KEY_FILE="private.asc" kubectl -n argocd-system create secret generic helm-secrets-private-keys --from-file=key.asc=$PRIVATE_KEY_FILE --dry-run=client -oyaml | \ kubectl label -f- -oyaml argocd.argoproj.io/secret-type=repository --dry-run=client --local | \ kubectl create -f-Deploy the Secret:
kubectl create -f helm-secrets-private-keys.yamlNote
Once your Platform Administrator has enabled Helm-secrets with Argo CD, the Argo CD repo server pod will not be able to initialize if this secret does not exist. Check pods in the
argocd-systemnamespace after creating the secret to confirm that the secret got mounted properly by the repo server:$ kubectl get pods -n argocd-system -l app.kubernetes.io/component=repo-server NAME READY STATUS RESTARTS AGE argocd-repo-server-77fd58b498-kjm95 1/1 Running 0 3m45s -
Create a
.sops.yamlfile in the Helm chart in which you want to use Helm Secrets. Add your GPG public key to this file. You can get the public key with:gpg --list-key "set-me@example.com"The
.sops.yamlfile should look something like this:--- creation_rules: - pgp: <public-gpg-key> -
Create a values file in your Helm chart repository and put values that should be encrypted into this file:
touch secrets.yamlThese values can then be referenced in templates as any other Helm values.
-
Encrypt the values file using
sops(as long as there is a.sops.yamlfile in the same folder containing your public GPG key you do not have to specify the GPG key when running the following command):sops --encrypt --in-place secrets.yamlTo test using the now encrypted
secrets.yamlfile together with the Helm chart, install the Helm Secrets plugin, and then run the following from the root folder of the Helm chart to template the Helm chart:helm template . --values secrets://secrets.yaml -
The file
secrets.yamlcan now safely be stored in a code repository as long as it is encrypted.Tip
To edit values in the encrypted values file, you can use
sopswhich will open the file in clear text in a configured editor:sops secrets.yamlThere is also a VSCode plugin which can simplify editing
sopsencrypted files directly in the VSCode editor.Tip
Add a pre-commit hook to ensure to not push files containing sensitive data that are not encrypted with
sops. -
In Argo CD, when you create your Application, add the secret values file (
secrets.yaml) as follow: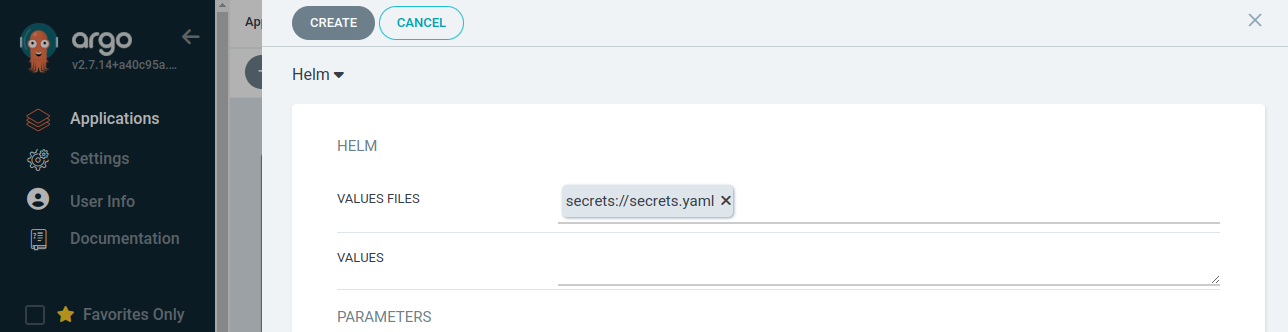
Here,
secrets.yamlis the relative path and name of the file containing encrypted values.
With SealedSecrets
The following steps assumes SealedSecrets is installed in the cluster. For installing SealedSecrets in a Compliant Kubernetes cluster, refer to the self-managed guide. You will need to contact your Platform Administrator requesting that you want to use SealedSecrets together with Argo CD.
-
Create a SealedSecret, the following steps will create a SealedSecret for the namespace in the current Kubernetes context:
export SEALED_SECRETS_CONTROLLER_NAMESPACE=sealed-secrets # set this to the namespace in which the controller is running in
export SECRET_VALUE=<secret-data> # this will be a value that should be encrypted/sealed
export KEY=foo # the key used for referencing SECRET_VALUE in the secret

kubectl create secret generic mysecret --dry-run=client --from-literal=$KEY=$SECRET_VALUE -o yaml | \
    kubeseal --format yaml > mysealedsecret.yaml
Note
With SealedSecrets it is possible to set a scope of a secret. By default this scope is set to
strictin which the SealedSecret controller uses the name and namespace of the secret as attributes during encryption, hence, the SealedSecret needs to be created with the same values for these attributes if the controller is to be able to decrypt the SealedSecret. It is possible to change the scope with the--scopeflag forkubeseal, refer to the official documentation for SealedSecrets for possible scopes. -
The generated SealedSecret manifest file
mysealedsecret.yamlwill contain the encrypted$SECRET_VALUEand is safe to store on, for example, GitHub. Push this manifest file to the repository containing the rest of your application manifests. -
Deploy the application containing the SealedSecret with Argo CD as any other application.
Using vals with HashiCorp's Vault
If you want to use vals with Vault, you will need to contact your Platform Administrator requesting that you want to use vals with Vault together with Argo CD.
-
Create a secret in the
argocd-systemNamespace calledvals-secret:apiVersion: v1 kind: Secret metadata: name: vals-secret namespace: argocd-system labels: argocd.argoproj.io/secret-type: vals-secret type: Opaque data: VAULT_ADDR: "" VAULT_NAMESPACE: "" VAULT_AUTH_METHOD: "" VAULT_ROLE_ID: "" VAULT_SECRET_ID: "" VAULT_TOKEN: ""Fill out required data in secret to connect it to your Vault.
Note
When encoding your data, make sure to use
echo -n <data> | base64to avoid adding a new line at the end of your encoded secret. -
Contact your Platform Administrator to restart the
argocd-repo-server. It is needed to load your secret environment variables so that Argo CD can connect to your Vault. -
Argo CD should now be able to connect to your Vault, to replace a value with a secret from your Vault, use the following syntax:
secrets+literal://vals!ref+vault://path/to/#/secretHere's an example of an Argo CD Application manifest:
apiVersion: argoproj.io/v1alpha1
kind: Application
metadata:
  name: argocd-application
  namespace: argocd-system
  finalizers:
  - resources-finalizer.argocd.argoproj.io
spec:
  destination:
      namespace: staging
      server: https://kubernetes.default.svc
  project: default
  source:
    helm:
      valueFiles:
      - values.yaml
      fileParameters:
        - name: password
          path: secrets+literal://vals!ref+vault://secret/user/#/password
    path: deploy/helm/app
    repoURL: https://github.com/username/repoistory.git
    targetRevision: HEAD
  syncPolicy:
    automated:
      prune: true
      selfHeal: true
Argo CD Notifications
Argo CD Notifications continuously monitors Argo CD applications and provides a flexible way to notify users about important changes in the application state. Using a flexible mechanism of triggers and templates you can configure when the notification should be sent as well as notification content.
To configure Argo CD notifications, make sure you are allowed to update the current Kubernetes objects:
secret/argocd-notifications-secretconfigmap/argocd-notifications-cm
For Elastisys Managed Argo CD, you should be able to modify those objects if you belong to any customer admin group, or if you are a customer admin user.
In case you're not, ask your platform administrator to add you accordingly.
Triggers & Templates
The trigger defines the condition when the notification should be sent. The definition includes name, condition and notification templates reference.
The notification template is used to generate the notification content. Templates are meant to be reusable and can be referenced by multiple triggers.
Both triggers & notification templates can be configured in argocd-notifications-cm ConfigMap.
Argo CD Notifications includes the catalog of useful triggers and templates. So you can just use them instead of reinventing new ones.
Note
The catalog triggers and templates can be found in the argocd-notifications-cm ConfigMap.
$ kubectl edit cm/argocd-notifications-cm -n argocd-system
If you don't have any triggers or templates defined, you can add the catalog template and trigger definitions
apiVersion: v1
kind: ConfigMap
metadata:
name: argocd-notifications-cm
data:
    context: |
        argocdUrl: "https://argocd.example.com"
    template.app-deployed: |
        ...
    template.app-health-degraded: |
        ...
    template.app-sync-failed: |
        ...
    template.app-sync-running: |
        ...
    template.app-sync-status-unknown: |
        ...
    template.app-sync-succeeded: |
        ...
    trigger.on-deployed: |
        ...
    trigger.on-sync-failed: |
        ...
    trigger.on-sync-running: |
        ...
    trigger.on-sync-status-unknown: |
        ...
    trigger.on-sync-succeeded: |
        ...
Notification Services
The notification services represent integration with services such as slack, email or custom webhook. Services are configured in argocd-notifications-cm ConfigMap using service.<type>.(<custom-name>) keys and might reference sensitive data from argocd-notifications-secret Secret.
Argo CD Notifications support multiple service types, and provide detailed steps on how to configure each service. To learn more, see Notification services.
Subscriptions
The subscription to Argo CD application events can be defined using notifications.argoproj.io/subscribe.<trigger>.<service>: <recipient> annotation. For example, the following annotation subscribes two Slack channels to notifications about every successful synchronization of the Argo CD application:
$ kubectl edit Application my-argo-application
apiVersion: argoproj.io/v1alpha1
kind: Application
metadata:
  name: my-argo-application
  annotations:
    notifications.argoproj.io/subscribe.on-sync-succeeded.slack: my-channel1;my-channel2
Example
To configure Email service for example:
-
Add Email username and password token to
argocd-notifications-secretsecret$ echo -n "sender@example.com" | base64 -w0 # c2VuZGVyQGV4YW1wbGUuY29t $ echo -n "secretPassword" | base64 -w0 # c2VjcmV0UGFzc3dvcmQ= $ kubectl edit -n argocd-system argocd-notifications-secretapiVersion: v1 kind: Secret metadata: name: argocd-notifications-secret namespace: argocd-system data: email-username: c2VuZGVyQGV4YW1wbGUuY29t email-password: c2VjcmV0UGFzc3dvcmQ= -
Register Email notification service
$ kubectl edit -n argocd-system argocd-notifications-cmAdd the service under the ConfigMap data
In case you want to use a separate SMTP server instead of gmailapiVersion: v1 kind: ConfigMap metadata: name: argocd-notifications-cm data: service.email.gmail: | username: $email-username password: $email-password host: smtp.gmail.com port: 465 from: $email-usernameapiVersion: v1 kind: ConfigMap metadata: name: argocd-notifications-cm data: service.email.custom: | username: $email-username password: $email-password host: smtp.custom.com port: 587 from: $email-username -
Subscribe to notifications by adding the notifications.argoproj.io/subscribe.on-sync-succeeded.gmail annotation to the Argo CD application:
$ kubectl patch app my-argo-application -p '{"metadata": {"annotations": {"notifications.argoproj.io/subscribe.on-sync-succeeded.gmail":"receiver@example.com"}}}' --type merge
Now, if we try syncing an application, we will get the notification once sync is completed.
Note
Email notification will not work if the sender has 2FA enabled.